7. Universal SmartNIC Turnkey App#
7.1. Introduction#
Universal Smart NIC app is a powerful tool that harnesses the performance and efficiency of hardware accelerators in DPUs. It also mitigates some hardware gaps by providing optimized software solution for advanced features like as port hair pinning, tunnel-transport, port hotplugging, etc.
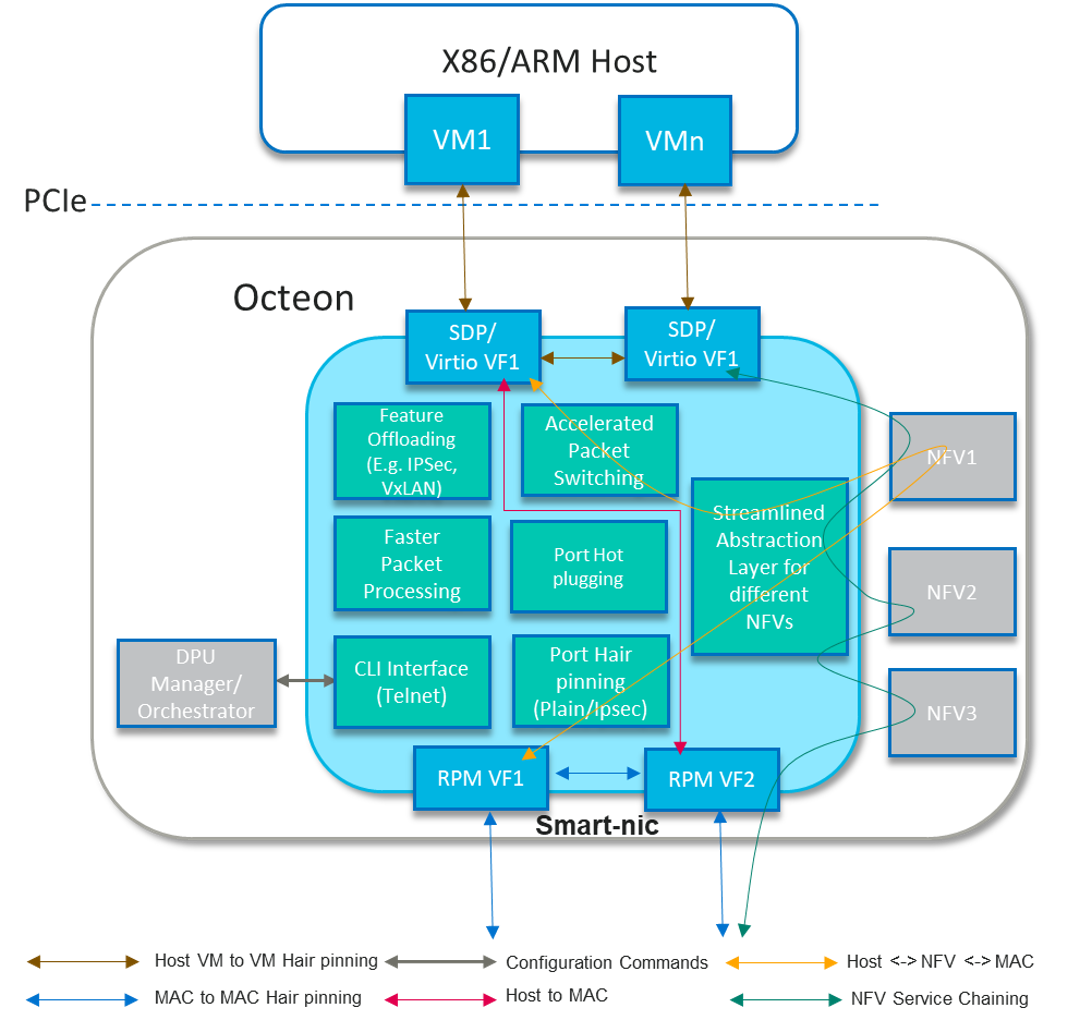
Port hairpinning facilitates packet routing between Ethernet MAC, PCI endpoint port, and network function virtualization (NFVs). With this feature NFV service chaining can be achieved.
Port hotplugging refers to dynamically adding or removing network ports from a virtual or host machine without requiring the VM or host machine to be powered off or restarted. In demanding situations, administrators can hotplug additional network ports to meet the high traffic flow without affecting other VMs operations.
7.1.1. Feature List#
Its adaptability ensures seamless integration and enhanced functionality.
7.1.1.1. Completed#
Rich command line interface (CLI) with telnet support
Port hairpininng
7.1.1.2. Planned#
100Gbps virtio
MAC Learning
Network function service chaining.
7.1.1.3. Pending#
Port hotplugging
200Gbs IPsec
SA sharing between CPT and SW
IPsec strong swan integration
virtio block support for storage
tunnel-transport
Pre-fragmentation, post fragmentation
Full back pressure support in all Traffic directions
PFC support on RPM
support for virtio queues
7.2. Getting the sources and compile#
Smart NIC app is part of the DAO package and follow
steps to build DAO
7.2.1. Binding required devices#
Smart NIC app needs RPM and SDP ports for inter connectivity between host and outside network.
7.2.1.1. Binding SDP and RPM VFs#
Check for device ID 0xa0f7 viz SDP VF and bind to vfio-pci
# dpdk-devbind.py -s
0002:1f:00.1 'Octeon Tx2 SDP Virtual Function a0f7' if=sdp31-0 drv=rvu_nicvf unused=vfio-pci
0002:1f:00.2 'Octeon Tx2 SDP Virtual Function a0f7' if=sdp31-1 drv=rvu_nicvf unused=vfio-pci

# dpdk-devbind.py -b vfio-pci 0002:1f:00.1
# dpdk-devbind.py -b vfio-pci 0002:1f:00.2
Create VFs, check for device ID 0xa064 viz RPM (NIX) VF and bind to vfio-pci
# echo 2 > /sys/bus/pci/devices/0002\:02\:00.0/sriov_numvfs

# dpdk-devbind.py -s
0002:02:00.1 'Octeon Tx2 RVU Virtual Function a064' if=eth1 drv=rvu_nicvf unused=vfio-pci
0002:02:00.2 'Octeon Tx2 RVU Virtual Function a064' if=eth5 drv=rvu_nicvf unused=vfio-pci

# dpdk-devbind.py -b vfio-pci 0002:02:00.1
# dpdk-devbind.py -b vfio-pci 0002:02:00.2
7.3. Launching the application#
The application has a number of command line options which can be provided in following syntax:
dao-smart-nic [EAL Options] -- [application options]
Eg.
dao-smart-nic [EAL options] -- -s <config file>
                               -h BOARD IP
                               -p port
                               [--enable-graph-stats]
7.3.1. Application Options#
Following are the application command-line options:
-h
Board’s IPv4 address which can be used to open telnet session. It is an optional parameter. Default host address is
0.0.0.0.
-p
- Set the L4 port number over which telnet session can be opened.
It is an optional parameter. Default port is
8086.
-s
Script name with absolute path which specifies the use case. It is a mandatory parameter which will be used to create desired graph for a given use case. Detailed command list provided below.
--enable-graph-stats
Enable graph statistics printing on console. By default, graph statistics are disabled.
--help
Dumps application usage.
7.3.2. Example Commands#
dao-smart-nic -c 0xf -a 0002:02:00.0 -a 0002:1f:00.1 -a 0002:1f:00.2 --
      -s ./app/smart-nic/smart-nic.cli -h 127.0.0.1 -p 50000   --enable-graph-stats
7.3.3. Supported CLI commands#
This section provides details on commands which can be used in <usecase>.cli
file to express the requested use case configuration.
Command |
Description |
Scope |
Optional |
|---|---|---|---|
graph <usecases> [bsz <size>]
[tmo <ns>] [coremask <bitmask>]
model <rtc/mcd/default> pcap_enable
<0/1> num_pcap_pkts <num> pcap_file
<output_capture_file>
|
Command to express the desired
use case. Also enables/disable
pcap capturing.
|
No |
|
graph start |
Command to start the graph.
This command triggers that no
more commands are left to be
parsed and graph initialization
can be started now. It must be
the last command in usecase.cli
|
No |
|
graph stats show |
Command to dump current graph
statistics.
|
Yes |
|
graph dump |
Command to dump current graph
which includes nodes debug info
|
Yes |
|
help graph |
Command to dump graph help
message.
|
Yes |
|
mempool <mempool_name> size
<mbuf_size> buffers
<number_of_buffers>
cache <cache_size> numa <numa_id>
|
Command to create mempool which
will be further associated to
RxQ to dequeue the packets.
|
No |
|
help mempool |
Command to dump mempool help
message.
|
Yes |
|
ethdev <ethdev_name> rxq <n_queues>
txq <n_queues> <mempool_name>
|
Command to create DPDK port with
given number of Rx and Tx queues
. Also attach RxQ with given
mempool. Each port can have
single mempool only i.e. all
RxQs will share the same mempool
.
|
No |
|
ethdev <ethdev_name> mtu <mtu_sz> |
Command to configure MTU of DPDK
port.
|
Yes |
|
ethdev <ethdev_name> promiscuous
<on/off>
|
Command to enable/disable
promiscuous mode on DPDK port.
|
Yes |
|
ethdev <ethdev_name> show |
Command to dump current ethdev
configuration.
|
Yes |
|
ethdev <ethdev_name> stats |
Command to dump current ethdev
statistics.
|
Yes |
|
help ethdev |
Command to dump ethdev help
message.
|
Yes |
|
pipeline port add <port_name> |
Command to add a port to the
forwarding plane.
|
Yes |
|
pipeline port del <port_name> |
Command to remove a port from
forwarding plane
|
Yes |
|
pipeline port link <src_port>
<dst_port>
|
Command to plumb two ports to
enable packet routing between
them.
|
Yes |
|
pipeline port unlink <src_port>
<dst_port>
|
Command to remove plumbing
between given ports and hence
terminating the packet flow.
|
Yes |
Script only
Telnet only
Script and telnet both
7.3.4. Runtime configuration#
Application allows some configuration to be modified at runtime using a telnet session.
Application initiates a telnet server with host address 0.0.0.0 and port number 8086
by default.
If user passes -h and -p options while running application,
then corresponding IP address and port number will be used for telnet session.
After successful launch of application,
client can connect to application using given host & port
and console will be accessed with prompt graph>.
Command to access a telnet session:
telnet <host> <port>
Example: dao-smart-nic is started with -h 127.0.0.1 and -p 50000 then
~# telnet 127.0.0.1 50000
Connected to 127.0.0.1

Welcome!

smart-nic> help ethdev

----------------------------- ethdev command help -----------------------------
ethdev <ethdev_name> rxq <n_queues> txq <n_queues> <mempool_name>
ethdev <ethdev_name> promiscuous <on/off>
ethdev <ethdev_name> mtu <mtu_sz>
ethdev <ethdev_name> stats
ethdev <ethdev_name> show
smart-nic> help pipeline

---------------------------- pipeline command help ----------------------------
pipeline port add <port_name>
pipeline port del <port_name>
pipeline port link <src_port> <dst_port>
pipeline port unlink <src_port> <dst_port>
smart-nic>
To exit the telnet session, type Ctrl + ].
This changes the graph> command prompt to telnet> command prompt.
Now running close or quit command on telnet> prompt
will terminate the telnet session.