10. Machine Learning#
The Data Plane Development Kit (DPDK) is an open-source software project managed by the Linux Foundation. It is designed to offload TCP packet processing from the operating system kernel to user-space processes, thereby enhancing computing efficiency and packet throughput.
The dpdk-test-mldev tool is a DPDK application designed to test various machine learning (mldev) use cases. As part of the DAO package, it provides a way for users to run inference operations with specific inputs.
Note
For detailed documentation related to dpdk-test-mldev, refer to documentation
10.1. Introduction#
The Marvell Machine Learning Inference Processor (MLIP) is a hardware acceleration engine designed to speed up inference workloads. TVM supports MLIP through the mrvl library, allowing models to be compiled for execution on MLIP hardware or simulator. During compilation, the model is partitioned into MLIP and CPU executable regions (depending on the operators and other factors in the model).
Note
The intention of the compiler will be to run the entire or at least the maximum part of the model on MLIP.
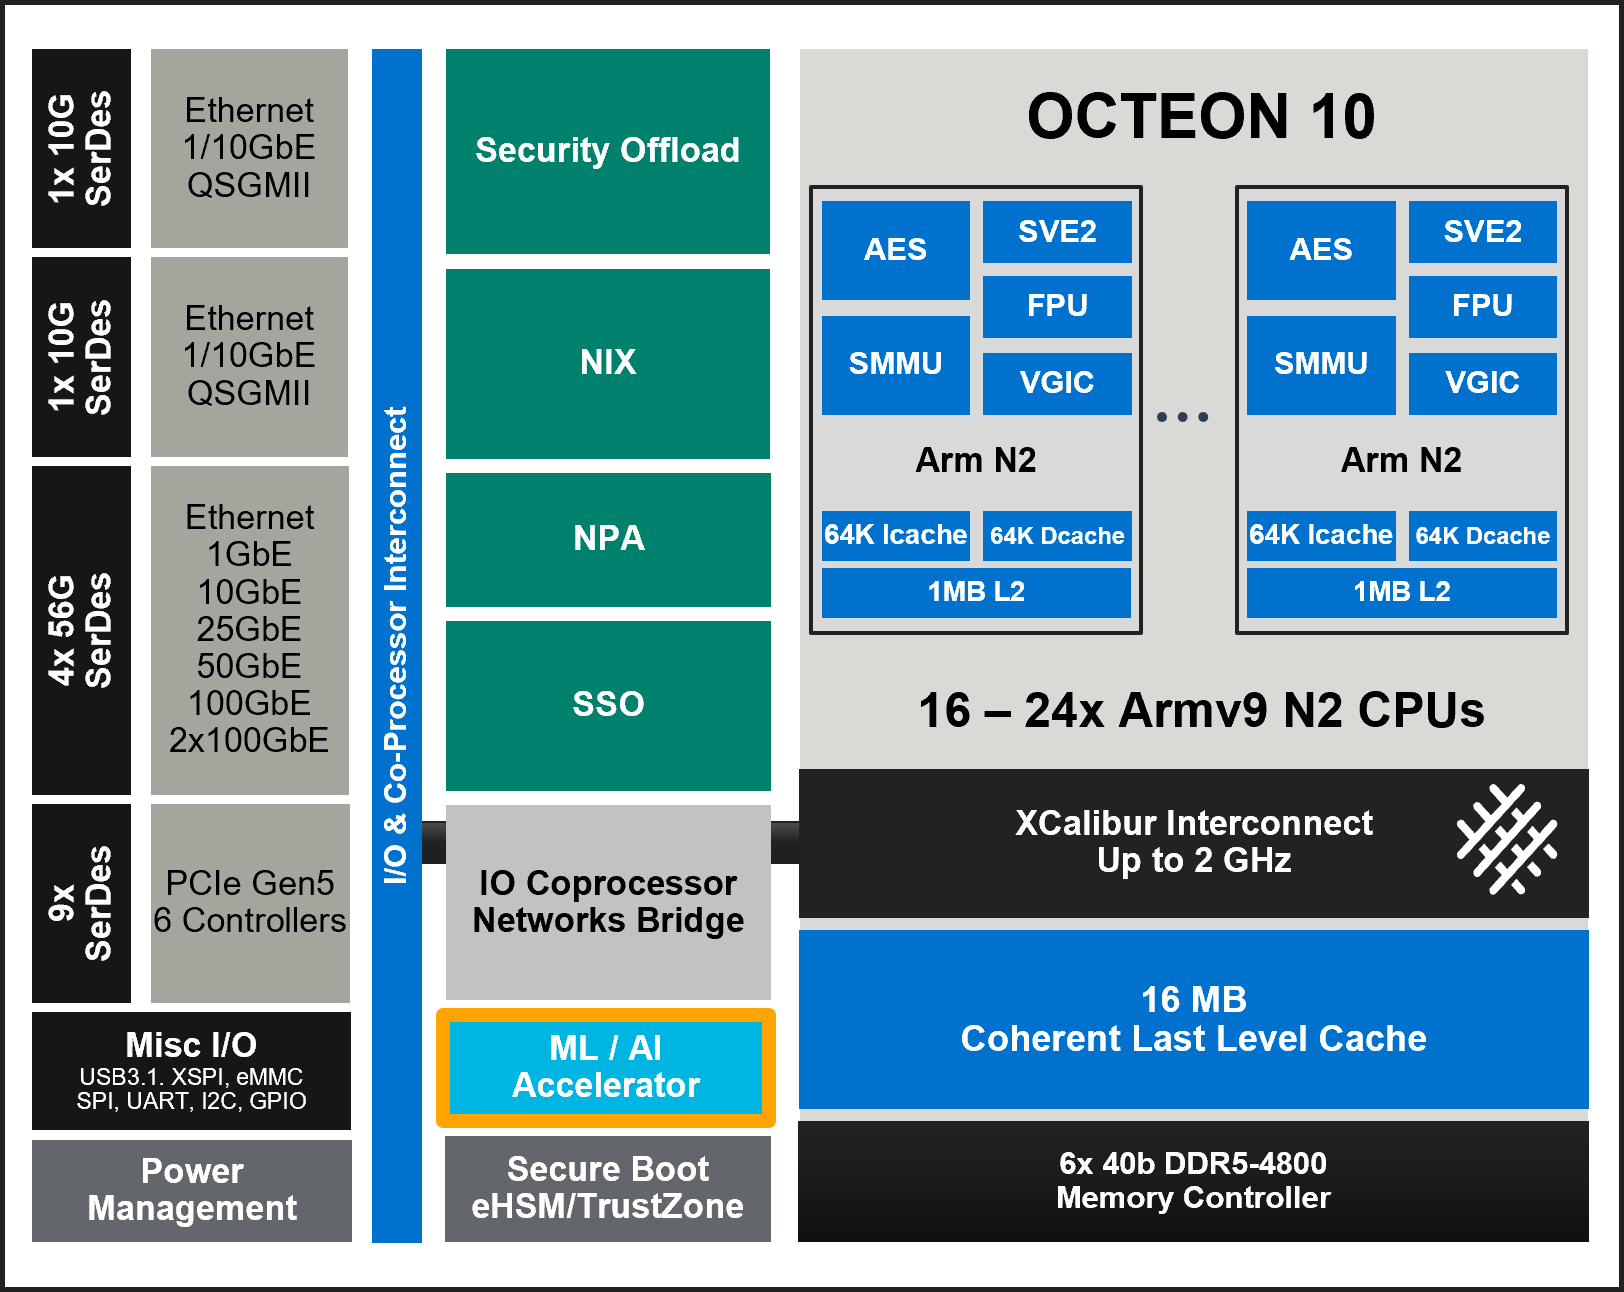
The figure shows the OCTEON 10 architecture, including both the ML / AI Accelerator(MLIP) and Arm Neoverse N2 CPUs. This hardware layout enables efficient hybrid execution, where supported model layers can be offloaded to the MLIP, while other parts of the model run on the CPU.
10.2. Setting Up The TVM Compiler Framework#
This section provides step-by-step instructions to set up the TVM compiler environment with Marvell’s MMLC backend support. It covers prerequisites, environment setup, installation of TVM and MMLC binaries, followed by configuration and build procedures.
10.2.1. Prerequisites#
The MMLC binaries are built to work with Ubuntu 20.04 or newer. Additionally, TVM requires CMake (>= 3.18) and LLVM (recommended >= 15).
10.2.1.1. Installing CMake#
Below are the steps to build and install CMake-3.27.8:
# Get archives
wget https://github.com/Kitware/CMake/releases/download/v3.27.8/cmake-3.27.8.tar.gz
tar -xzf cmake-3.27.8.tar.gz

# Build
cd cmake-3.27.8
./configure --prefix=${INSTALL_PREFIX_HOST} -- -DCMAKE_USE_OPENSSL=OFF
make -j $(nproc) && make install

# Create a symlink so CMake is accessible from /usr/share
ln -s /share/cmake-3.27 /usr/share/cmake-3.27
10.2.1.2. Installing LLVM#
Below are the steps to install llvm-15:
# Add LLVM repo
apt-get install python3-venv lsb-release software-properties-common
sh -c 'echo "deb http://apt.llvm.org/$(lsb_release -s -c)/ llvm-toolchain-$(lsb_release -s -c)-15 main" >> /etc/apt/sources.list'

# Setup gpg key
wget -qO- https://apt.llvm.org/llvm-snapshot.gpg.key | tee /etc/apt/trusted.gpg.d/apt.llvm.org.asc

# Install LLVM
add-apt-repository -y ppa:ubuntu-toolchain-r/test
apt-get install -y llvm-15-dev
10.2.1.3. Setting up the Python Environment for TVM#
TVM and dependencies requires Python >= 3.8. Recommended version of Python is 3.10.
# Create virtual environment
python3.8 -m venv tvm-venv
source tvm-venv/bin/activate

# Create `requirements.txt` containing list of all python packages with versions.
cat > requirements.txt << EOF
attrs==23.2.0
cloudpickle==2.2.1
decorator==5.1.1
ml-dtypes==0.5.1
numpy==1.25.0
onnx==1.16.1
onnxruntime==1.20.0
graphviz==0.20.1
protobuf==4.21.12
psutil==5.9.7
pybind11==2.11.1
scipy==1.11.4
tornado==6.2
typing_extensions==4.9.0
EOF

# Install python package
python -m pip install --upgrade pip wheel setuptools
python -m pip install -r requirements.txt
10.2.1.4. Setting Up The Toolchain#
Install the cross-compilation toolchain.
#install the toolchain
apt-get install g++-aarch64-linux-gnu
10.2.1.5. Build Variables#
The build procedure assumes that the following environment variables are defined:
Variable |
Description |
|---|---|
TVM_SOURCE_DIR |
Path to the cloned TVM sources |
ML_TOOLS_DIR |
Path to the cloned MMLC binaries |
INSTALL_PREFIX_HOST |
Path to install sources compiled for x86_64 host machine. |
Note
Set TVM_SOURCE_DIR and ML_TOOLS_DIR after cloning the TVM and MarvellMLTools repositories, as described in Cloning and Building TVM Sources and Setting MMLC Binaries.
10.2.1.6. Setup Base Environment#
To set up the common environment on x86_64 host machine, follow these steps:
# Add libraries to PATH and LD_LIBRARY_PATH
export PATH=${INSTALL_PREFIX_HOST}/bin:${PATH}
export LD_LIBRARY_PATH=${INSTALL_PREFIX_HOST}/lib:${LD_LIBRARY_PATH}
10.2.2. Cloning and Building TVM Sources#
Clone TVM source code and checkout master branch from Marvell’s TVM repository.
git clone https://github.com/MarvellEmbeddedProcessors/tvm.git
cd tvm
git checkout master
git submodule update --init --recursive
Configure and Build TVM:
# Configure TVM
cmake \
   -S ${TVM_SOURCE_DIR} \
   -B ${TVM_SOURCE_DIR}/build-x86_64 \
   -DCMAKE_INSTALL_PREFIX=${INSTALL_PREFIX_HOST} \
   -DUSE_MRVL=ON \
   -DUSE_LIBBACKTRACE=AUTO \
   -DUSE_LLVM=llvm-config-15 \
   -DSUMMARIZE=ON

# Build and install
make -C ${TVM_SOURCE_DIR}/build-x86_64 -j $(nproc)
make -C ${TVM_SOURCE_DIR}/build-x86_64 install
After building TVM, install the Python bindings to enable scripting and copy the configuration files required for target-specific settings:
# Install Python module
cd ${TVM_SOURCE_DIR}/python
python setup.py install

# Install TVM configs and set TVM_CONFIGS_JSON_DIR
mkdir -p ${INSTALL_PREFIX_HOST}/share/tvm
cp -r ${TVM_SOURCE_DIR}/configs ${INSTALL_PREFIX_HOST}/share/tvm
10.2.3. Setting MMLC Binaries#
Clone MMLC binaries from the MarvellMLTools GitHub repository:
git clone "https://github.com/MarvellEmbeddedProcessors/MarvellMLTools"
export ML_TOOLS_DIR=$(pwd)/MarvellMLTools

# Copy MMLC binaries to INSTALL_PREFIX_HOST
mkdir -p ${INSTALL_PREFIX_HOST}/bin
cp ${ML_TOOLS_DIR}/bin/* ${INSTALL_PREFIX_HOST}/bin/
10.3. Model Compilation#
Model compilation for inference can be targeted either for simulation or for execution on Octeon 10 hardware. Each execution mode requires a different compilation process.
10.3.1. Model Layers and Operators#
Based on the operators supported by the ML hardware accelerator, the compiler partitions the neural network graph into multiple regions. Layers that are supported on MLIP hardware accelerator are executed entirely on it, while the remaining parts of the graph are executed on the Arm Neoverse N2 CPU.
Depending on the composition of layers in a model, a model can be categorized into one of three types:
MRVL-only: All layers are supported by MLIP and are executed exclusively on the MLIP hardware accelerator.
LLVM-only: All layers are compiled using the LLVM backend for CPU execution.
Hybrid: containing both MRVL and LLVM layers
The following table lists the operators currently supported by the MLIP hardware accelerator.
Operator |
Relay Node |
|---|---|
Conv2d |
nn.conv2d |
Gemm/FC/Matmul |
nn.dense |
Maxpool2d |
nn.max_pool2d |
Avgpool2d |
nn.avg_pool2d |
Elementwise sum |
add |
Concat |
concatenate |
Relu |
nn.relu |
Batch_flatten |
nn.batch_flatten |
Reshape |
reshape |
Squeeze |
squeeze |
10.3.2. Compiler Options#
TVM, by default generates the compiled model in TAR format. Alternatively, the model’s MRVL regions can be compiled and generated in a binary format. Set the environment variable MRVL_SAVE_MODEL_BIN=1 to enable saving the model in binary format also. You can then compile the model for MLIP along with LLVM targets using the following tvmc command:
# Save model binaries for MLIP target
export MRVL_SAVE_MODEL_BIN=1
# Compile model for MLIP (Simulator / Hardware) + LLVM (x86_64 / AArch64) target
export TVM_CONFIGS_JSON_DIR=${INSTALL_PREFIX_HOST}/share/tvm/configs
python -m tvm.driver.tvmc compile \
   --target=<target> \
   --cross-compiler <cross-compiler> \
   --target-llvm-<options> \
   --target-mrvl-<options> \
   --<tvm-generic-options> \
   model_file.onnx
TVM generic attributes needed to compile the model for MLIP target:
--target=: Target architecture for the model compilation. To compile using a hybrid of mlip and llvm architecture, for Hardware + LLVM target, it should be set tomrvl, llvm -mtriple=aarch64-linux-gnu -mcpu=neoverse-n2, whereas in case of simulator + LLVM target it should be set tomrvl, llvm. To compile using only LLVM backend, usellvm -mtriple=aarch64-linux-gnu -mcpu=neoverse-n2for hardware andllvmfor simulator.--cross-compiler: Compiling the ONNX model for HW mode requires a cross compiler. This option is not required for simulator mode.
MLIP Specific command line options:
--target-mrvl-mattr=: Attributes specific to Marvell ML Compiler. This option is used to set different compilation options for marvell backend compiler (MMLC). The supported values for--target-mrvl-mattrare:hw/sim=: Target run mode. Supported values are hw, sim. hw is for hardware target and sim is for simulator (x86_64) target. (Default: sim)-arch=: Target run architecture. Supported values are cn10ka, cnf10kb. (Default: cn10ka)-quantize=: Quantization mode. Supported value is fp16 (Default).-wb_pin_ocm=: Weight Bias pinning to OCM. Supported values are 0, 1. (Default: 1) For large weights and biases, pinning to OCM is not possible. In such cases, set the this option to 0.
--target-mrvl-num_tiles=: Number of tiles. Supported values are 1, 2, 4, 8. (Default: 8)--target-mrvl-tools=: Path to MMLC compiler tools.--target-mrvl-model_name=: Model name for compilation (default: model)
Note
-wb_pin_ocm option in –target-mrvl-mattr is used to pin the weights and biases to OCM. To enable this option, please set the environment variable MRVL_ENABLE_WB_PIN_OCM=1.
10.3.3. FP16 Compilation Flow#
Non-quantized model files utilize 32-bit floating point (FP32) representations for network parameters, ensuring high numerical precision. In contrast, the FP16 compilation flow performs all computations using 16-bit floating point (FP16) precision. This approach offers significant advantages in both computational speed and memory efficiency, effectively halving resource usage compared to FP32. Moreover, FP16 compilation does not require a separate profiling step, streamlining the deployment process.
The FP16 flow supports two compilation scenarios: MRVL-only FP16 Compilation Flow and Hybrid FP16 Compilation Flow.
In MRVL-only flow, the entire model graph is compiled to run exclusively on the MLIP hardware accelerator. This means all supported layers are offloaded to MRVL (MLIP), and no CPU execution is involved. Similarly, in Hybrid Flow, only MLIP-compatible layers are executed on hardware, while the remaining layers are compiled using LLVM and run on the CPU. During compilation, MLIP-compatible and LLVM-only layers are identified, partitioned, and executed on the appropriate backend. If the model contains only MLIP-supported layers, it is executed entirely on MLIP; likewise, if only LLVM-supported layers are present, the model is executed fully on the CPU. When compiling LLVM layers for hardware execution, a suitable cross-compiler must be available on the host machine to generate compatible binaries from the host system.
export TARGET_TRIPLET=aarch64-linux-gnu
Use -quantize=fp16 option in the --target-mrvl-mattr during compilation to enable FP16 compilation flow.
Examples:
# Compile model for cn10ka Hardware + LLVM AArch64 target, with fp16 quantization
export MRVL_SAVE_MODEL_BIN=1
export TVM_CONFIGS_JSON_DIR=${INSTALL_PREFIX_HOST}/share/tvm/configs
export MRVL_ENABLE_WB_PIN_OCM=1
python -m tvm.driver.tvmc compile \
    --target="mrvl, llvm -mtriple=${TARGET_TRIPLET} -mcpu=neoverse-n2" \
    --cross-compiler="${TARGET_TRIPLET}-gcc" \
    --target-mrvl-mattr='hw -arch=cn10ka -quantize=fp16 -wb_pin_ocm=1' \
    --target-mrvl-tools=${INSTALL_PREFIX_HOST} \
    --target-mrvl-num_tiles=4 \
    --output model.tar \
    model.onnx
# Compile model for cn10ka Simulator + LLVM x86_64 target, with fp16 quantization
export MRVL_SAVE_MODEL_BIN=1
export TVM_CONFIGS_JSON_DIR=${INSTALL_PREFIX_HOST}/share/tvm/configs
export MRVL_ENABLE_WB_PIN_OCM=1
python -m tvm.driver.tvmc compile \
    --target="mrvl, llvm" \
    --target-mrvl-mattr='sim -arch=cn10ka -quantize=fp16 -wb_pin_ocm=1' \
    --target-mrvl-tools=${INSTALL_PREFIX_HOST} \
    --target-mrvl-num_tiles=4 \
    --output model.tar \
    model.onnx
10.3.4. Compilation Flow for CPU Execution#
This compilation flow is used to run the model entirely on the CPU, without using the MLIP hardware acceleration. It uses the LLVM backend and supports both x86 and AArch64 architectures. x86 is used for running simulator-based inferences, while AArch64 is for running inference on the target hardware. When compiling for AArch64, a suitable cross-compiler must be available on the host machine to generate compatible binaries from the host system.
export TARGET_TRIPLET=aarch64-linux-gnu
Use target= "llvm" to enable this compilation flow. Use only LLVM related options during compilation.
Examples :
# Compile model using Native LLVM AArch64 Compilation Flow for Hardware Execution
export MRVL_SAVE_MODEL_BIN=1
export TVM_CONFIGS_JSON_DIR=${INSTALL_PREFIX_HOST}/share/tvm/configs
export MRVL_ENABLE_WB_PIN_OCM=1
python -m tvm.driver.tvmc compile \
    --target="llvm -mtriple=${TARGET_TRIPLET} -mcpu=neoverse-n2" \
    --cross-compiler="${TARGET_TRIPLET}-gcc" \
    --output model.tar \
    model.onnx
# Compile model using Native LLVM x86_64 Compilation Flow for Simulator Execution
export MRVL_SAVE_MODEL_BIN=1
export TVM_CONFIGS_JSON_DIR=${INSTALL_PREFIX_HOST}/share/tvm/configs
export MRVL_ENABLE_WB_PIN_OCM=1
python -m tvm.driver.tvmc compile \
    --target="llvm" \
    --output model.tar \
    model.onnx
The compiler generates the following artifacts:
├── bin_<model_name>_0
│   └── <model_name>_0.bin
├── model.tar
The CPU execution flow produces only a model.tar file, without any separate binary files. The model.tar file can be used to run inference on Marvell ML hardware associated with Octeon10 or via the MLIP software simulator. If the compiled model is MRVL-only, inference can also be performed using <model_name>_0.bin.
Note
Please DO NOT use the <model_name>_0.bin for LLVM only and Hybrid models.
10.3.5. Pre-processing and Post-processing Steps#
The Marvell ML Compiler (MMLC) backend requires ONNX models to have a static shape format. In ONNX, dynamic shapes refer to models that can process input tensors with variable dimensions (e.g., varying batch sizes or sequence lengths). While dynamic shapes offer flexibility during model execution, they are not supported by the MMLC backend, which requires fixed, pre-determined dimensions for all inputs and outputs.
Additionally, running inference with MMLC involves preprocessing input data into .npz and .bin formats. The models as well as the scripts to execute these preprocessing steps are available in the ml-models branch of the MarvellMLTools GitHub repository under the models and utils folders respectively.
cd ${ML_TOOLS_DIR}
git checkout ml-models
To convert a dynamic shape model into a static shape model, you can use convert_shape_d2s.py script, which ensures the model’s input and output shapes are explicitly defined, enabling compatibility with the MMLC backend.
 python ${ML_TOOLS_DIR}/utils/convert_shape_d2s.py \
--input_onnx input_model.onnx \
--output_onnx model.onnx
Running inference on the MLIP Simulator requires input data in NPZ format. You can use the generate_npz.py script to convert ONNX model inputs from a JSON file into an NPZ file suitable for inference.
python ${ML_TOOLS_DIR}/utils/generate_npz.py \
--model_onnx model.onnx \
--input_json_file input.json \
--input_npz_file input.npz
Binary input file can be generated using convert.py script.
python ${ML_TOOLS_DIR}/utils/convert.py \
json2bin \
--model_onnx model.onnx \
--io_type "input" \
--json_file input.json \
--bin_file input.bin
10.4. Running Inference#
There are two primary execution modes for running inference on machine learning models using Marvell’s platform: Simulator Mode and DPDK ML Test Application Mode.
10.4.1. Simulator Mode#
The ML Software Simulator can run the models in a simulated environment on an x86 host. This allows the user to test and tune a model as it would run on supported hardware without need of a full chip simulation or a target hardware. This mode requires the model to be compiled for the simulator.
**MRVL_ML_ARCH** environment variable can be used to set hardware.
TVMC run command line options:
--inputs: Input file in NPZ format.--outputs: Output file in NPZ format.--number: Number of inferences to run.--print-time: Print time taken for each inference.model.tar: Compiled model for MLIP simulator.
Example:
# Run inference on MLIP simulator for cn10ka target
MRVL_ML_ARCH="cn10ka" \
python -m tvm.driver.tvmc run \
    --inputs input.npz \
    --outputs output.npz \
    --number=1 \
    model.tar
10.4.2. DPDK ML Test Application Mode#
DPDK ML Test Application Mode is designed for running inference on actual hardware. Once the model is compiled, it is packaged into a model.tar archive. This archive can then be deployed using the DPDK ML test application, enabling inference on Marvell’s hardware platforms.
# Enable hugepages
mkdir -p /mnt/huge
mount -t hugetlbfs -o pagesize=2M nodev /mnt/huge
echo 4096 > /sys/kernel/mm/hugepages/hugepages-2048kB/nr_hugepages

# Bind ML device
dpdk-devbind.py -b vfio-pci 0000:00:10.0

# Run inferences with dpdk-test-mldev application
dpdk-test-mldev --lcores=4-23 -a 0000:00:10.0,fw_path=/lib/firmware/mlip-fw.bin -- \
   --test inference_ordered \
   --filelist model.tar,input.bin,output.bin,reference.bin \
   --tolerance 5 \
   --stats \
   --repetitions 1000
For models generated by TVM that have a single MRVL layer and zero LLVM layers, the <model_name>_0.bin generated during the compilation stage can also be used to run inferences with DPDK test application.
# Enable hugepages
mkdir -p /mnt/huge
mount -t hugetlbfs -o pagesize=2M nodev /mnt/huge
echo 4096 > /sys/kernel/mm/hugepages/hugepages-2048kB/nr_hugepages

# Bind ML device
dpdk-devbind.py -b vfio-pci 0000:00:10.0

# Run inferences with dpdk-test-mldev application
dpdk-test-mldev --lcores=4-23 -a 0000:00:10.0,fw_path=/lib/firmware/mlip-fw.bin -- \
    --test inference_ordered \
    --filelist <model_name>_0.bin,input.bin,output.bin,reference.bin \
    --tolerance 5 \
    --stats \
    --repetitions 1000
10.4.3. Output Validation#
The compare_json.py can be used to compare the output generated by the TVM models with the reference output. The script provides options to check if the outputs match with tolerance levels. The comparison script supports formatted JSON outputs. convert.py script can be used to convert the output generated in binary format to JSON.
The script supports following options:
test_json_file: Output generated by TVM model.base_json_file: Reference output.quantize: Quantization mode. Supported value is fp16 (default).fudge_factor: Tolerance level for floating point comparison. The default value is 0.03 (3% tolerance).print_level: Print level, controls the verbosity of dumps from the script.diffdumps the differences between the real and expected outputs.fulldumps the entire contents of real and expected outputs.Noneis a quieter option where no dumps are provided.
Examples:
# Compare output generated by TVM model with fp16 quantization
python ${ML_TOOLS_DIR}/utils/compare_json.py \
--test_json_file output.json \
--base_json_file golden_output.json \
--quantize fp16 \
--fudge_factor 0.03 \
--print_level diff
10.5. Example Models/Usecases#
10.5.1. Resnet50-v1-12 Model Compilation using Jupyter Notebook#
ResNet50 is a deep learning model used for image classification. It uses residual blocks to improve training efficiency and accuracy. This model is widely used for recognizing and categorizing objects in images.
Setup TVM framework using steps in Setting Up The TVM Compiler Framework. Once the environment is configured, proceed with the steps below to preprocess the input, compile the model, run inference on the hardware, and post-process the output.
10.5.1.1. Preprocessing of Input#
Involves preprocessing the input image to the required size and format, and then converting it to a binary format that the model can accept as an input. This is done using the image2bin.py script available in the ml-models branch of MarvellMLTools repository. The input can be any JPEG, JPG or PNG image that can be converted to an RGB 3-channel format.
# Convert input in Image format to binary format
python ${ML_TOOLS_DIR}/utils/image2bin.py \
--image_file input.jpeg \
--bin_file input.bin
10.5.1.2. Model Compilation using TVMC package#
Download the model from Onnx models Github repository.
wget https://github.com/onnx/models/raw/main/validated/vision/classification/resnet/model/resnet50-v1-12.onnx
Use the convert_shape_d2s.py script from the ml-models branch of the MarvellMLTools repository to ensure the model has fixed input/output dimensions.
cd ${ML_TOOLS_DIR}
git checkout ml-models

python ${ML_TOOLS_DIR}/utils/convert_shape_d2s.py \
--input_onnx resnet50-v1-12.onnx \
--output_onnx model.onnx
Set compilation environment variables and compile the model using TVMC package.
export MRVL_SAVE_MODEL_BIN=1
export TVM_CONFIGS_JSON_DIR=${INSTALL_PREFIX_HOST}/share/tvm/configs
export MRVL_ENABLE_WB_PIN_OCM=1
python -m tvm.driver.tvmc compile \
    --target="mrvl, llvm -mtriple=${TARGET_TRIPLET} -mcpu=neoverse-n2" \
    --cross-compiler="${TARGET_TRIPLET}-gcc" \
    --target-mrvl-mattr='hw -arch=cn10ka -quantize=fp16 -wb_pin_ocm=0' \
    --target-mrvl-num_tiles=8 \
    --output model.tar \
    model.onnx
10.5.1.3. Model Execution on Hardware#
The preprocessed binary is given as an input to the model. The model processes the input, runs the inference operation, and generates the output in binary format.
# Enable hugepages
mkdir -p /mnt/huge
mount -t hugetlbfs -o pagesize=2M nodev /mnt/huge
echo 4096 > /sys/kernel/mm/hugepages/hugepages-2048kB/nr_hugepages

# Bind ML device
dpdk-devbind.py -b vfio-pci 0000:00:10.0

# Run inferences with dpdk-test-mldev application
dpdk-test-mldev --lcores=4-23 -a 0000:00:10.0,fw_path=/lib/firmware/mlip-fw.bin -- \
--test inference_ordered \
--filelist model.tar,input.bin,output.bin,reference.bin \
--tolerance 5 \
--stats \
--repetitions 1000
10.5.1.4. Postprocessing of Output#
The binary output generated by the model is converted into a JSON file for easier interpretation and analysis. This is done using the bin2json.py Python script.
# Convert output in binary format to JSON format
python ${ML_TOOLS_DIR}/utils/bin2json.py \
--bin_file output.bin \
--json_file output.json
10.5.1.5. Compilation and Inference on Software Simulator#
This section describes how to compile the ResNet50-v1-12 ONNX model and run inference using a Jupyter notebook workflow. The notebook automates the process by downloading the model, preparing a sample ImageNet image, compiling the model, running inference on the simulator, and visualizing the output using matplotlib. Before running the notebook, ensure that Jupyter is installed and properly set up inside the same virtual environment used for TVM. If Jupyter is not already installed, install it using:
pip install jupyter
Check out the
ml-modelsbranch in the MarvellMLTools repository.Open the
Resnet50.ipynbnotebook located in the notebooks directory.Update all necessary file paths in the notebook so they correctly point to your local environment.
Activate your virtual environment and install jupyter kernel inside the env using:
pip install ipykernel
python -m ipykernel install --user --name tvm-venv --display-name "Python (tvm-venv)"
This notebook requires the following packages. Install them with:
pip install matplotlib
pip install requests
Launch jupyter notebook:
jupyter notebook Resnet50.ipynb
Before running the notebook, make sure Jupyter is using the virtual environment you created:
In the Jupyter menu bar, go to Kernel
Select Change Kernel
Choose Python (tvm-venv)
Note
Ensure that TVM is compiled and ready before running the notebook. Refer to Setting Up The TVM Compiler Framework for detailed setup instructions. To avoid path-related issues during execution, copy the notebook to the base directory that contains tvm, MarvellMLTools, and other related dependencies, and launch it from there.
10.5.2. LUCID#
10.5.2.1. Introduction#
LUCID (Lightweight, Usable CNN in DDoS Detection) is a deep learning framework designed to detect DDoS attacks. It utilizes Convolutional Neural Networks (CNNs) to effectively distinguish between malicious and benign traffic flows.
10.5.2.2. Training Model#
Train the model using the steps provided in the repository. The training workflow uses a subset of the CIC-DDoS-2019 dataset included in the LUCID repository under the sample-dataset directory. Quantized versions of the trained LUCID model—INT8 (10t-10n-lucid_int8_t08_b01) and FP16 (10t-10n-lucid_fp16_t08_b01)—are available in the models directory of the ml-models branch of the MarvellMLTools repository and are optimized for inference. You may either train the model from scratch following the instructions in the model repository or directly use the provided INT8 and FP16 pretrained models for inference. If you choose to use a pretrained model, run it directly using lucid_run.py and skip the model compilation step described below.
Hyperparameters used for training:
Maximum number of packets/sample (n): 10
Time window (t): 10 seconds
Note
Links to the model repository, the research paper, and the dataset are provided in the References section.
10.5.2.3. Model Compilation#
After training, the model is saved in h5 format. Convert it to ONNX format for compatibility with the TVM compiler.
pip install tensorflow>=2.16.1 tf2onnx==1.16.1
python -c "import tensorflow as tf; m=tf.keras.models.load_model('output/10t-10n-DOS2019-LUCID.h5'); tf.saved_model.save(m, '10t-10n-DOS2019-LUCID.saved_model')"
python -m tf2onnx.convert --saved-model 10t-10n-DOS2019-LUCID.saved_model --output lucid_RAW.onnx
Compile the model using TVMC package.
cd ${ML_TOOLS_DIR}
git checkout ml-models

python ${ML_TOOLS_DIR}/utils/convert_shape_d2s.py \
--input_onnx lucid_RAW.onnx \
--output_onnx model.onnx
Set compilation environment variables and compile the model using TVMC package.
export MRVL_SAVE_MODEL_BIN=1
export TVM_CONFIGS_JSON_DIR=${INSTALL_PREFIX_HOST}/share/tvm/configs
export MRVL_ENABLE_WB_PIN_OCM=1
python -m tvm.driver.tvmc compile \
    --target="mrvl, llvm -mtriple=${TARGET_TRIPLET} -mcpu=neoverse-n2" \
    --cross-compiler="${TARGET_TRIPLET}-gcc" \
    --target-mrvl-mattr='hw -arch=cn10ka -quantize=fp16 -wb_pin_ocm=0' \
    --target-mrvl-num_tiles=8 \
    --output model.tar \
    model.onnx
10.5.2.4. Run Script#
As part of the DAO release, we are providing a lucid_run.py script to test the models with any pcap dataset. The script processes the pcap file, runs inference using the specified model, and generates the output.
Command Line Options:
To run inference using the lucid_run.py script with a sample dataset, use the following command line options .
python lucid_run.py [-h, --help]
                    -pl PCAP_FILE, --pcap_file PCAP_FILE
                    -m MODEL, --model MODEL
                    [-y DATASET_TYPE, --dataset_type DATASET_TYPE]
Descriptions:
-h, --help:Display this help message and exit.
-pl PCAP_FILE, --pcap_file PCAP_FILE:Perform a prediction on a pcap file. Follow this option with a pcap file path (e.g., /path/to/traffic_dataset.pcap).
-m MODEL, --model MODEL:Specify the model file for prediction. The model should be a trained model in binary format.
-y DATASET_TYPE, --dataset_type DATASET_TYPE:Choose the dataset type. Options are DOS2017, DOS2018, DOS2019, SYN2020. This is used to generate classification statistics (e.g., accuracy, F1 score) by comparing the ground truth labels with LUCID’s output.
Confusion Matrix is printed in the following format:
TP
FN
FP
TN
Example Run:
This example demonstrates how to predict network traffic from the CIC-DDoS-2019-DNS.pcap file using the 10t-10n-lucid_fp16_t08_b01.bin model:
python ${ML_TOOLS_DIR}/utils/lucid_run.py \
    -pl CIC-DDoS-2019-DNS.pcap \
    -m 10t-10n-lucid_fp16_t08_b01.bin
10.5.3. Mnist-12#
The MNIST model is a convolutional neural network (CNN) trained to recognize handwritten digits using grayscale images resized to 28x28 pixels, with white digits on a black background and pixel values normalized to the [0.0, 1.0] range.
Download the Mnist-12 ONNX Model from Onnx models Github repository.
wget https://github.com/onnx/models/raw/main/validated/vision/classification/mnist/model/mnist-12.onnx
Use the convert_shape_d2s.py script from the ml-models branch of the MarvellMLTools repository to ensure the model has fixed input/output dimensions.
cd ${ML_TOOLS_DIR}
git checkout ml-models

python ${ML_TOOLS_DIR}/utils/convert_shape_d2s.py \
--input_onnx mnist-12.onnx \
--output_onnx model.onnx
Any valid .jpg, .jpeg, or .png image with three color channels (RGB) can be used as input. The image will be converted to grayscale during preprocessing. The image can be of any resolution, as it will be resized to 32x32 pixels. The image should contain a clearly visible and centered subject(digit), without excessive background or noise. An example input image is shown below.

Preprocess input image to configure it for mnist model and convert input image to bin format for running inference on hardware.
pip install opencv-python
python -c "import numpy as np, cv2; gray=cv2.cvtColor(cv2.imread('input.jpg'), cv2.COLOR_BGR2GRAY); gray=cv2.resize(gray,(32,32)).astype(np.float32)/255; input=np.reshape(gray,(1,1,32,32)); input.tofile('input.bin')"
Set compilation environment variables and compile the model.
export MRVL_SAVE_MODEL_BIN=1
export TVM_CONFIGS_JSON_DIR=${INSTALL_PREFIX_HOST}/share/tvm/configs
export MRVL_ENABLE_WB_PIN_OCM=1
python -m tvm.driver.tvmc compile \
    --target="mrvl, llvm -mtriple=${TARGET_TRIPLET} -mcpu=neoverse-n2" \
    --cross-compiler="${TARGET_TRIPLET}-gcc" \
    --target-mrvl-mattr='hw -arch=cn10ka -quantize=fp16 -wb_pin_ocm=1' \
    --target-mrvl-num_tiles=4 \
    --output model.tar \
    model.onnx
Use the dpdk-test-mldev application to run inference with the compiled model and preprocessed input.
mkdir -p /mnt/huge
mount -t hugetlbfs -o pagesize=2M nodev /mnt/huge
echo 4096 > /sys/kernel/mm/hugepages/hugepages-2048kB/nr_hugepages

# Bind ML device
dpdk-devbind.py -b vfio-pci 0000:00:10.0

# Run inferences with dpdk-test-mldev application
dpdk-test-mldev --lcores=4-23 -a 0000:00:10.0,fw_path=/lib/firmware/mlip-fw.bin -- \
    --test inference_ordered \
    --filelist <model_name>_0.bin,input.bin,output.bin \
    --tolerance 5 \
    --stats \
    --repetitions 1000
Use the following Python snippet to interpret the predicted digit:
python3 -c "import numpy as np; output = np.fromfile('output.bin', dtype=np.float32); print('Predicted digit:', np.argmax(output))"
The following is an example output generated from the input image provided earlier:
Predicted digit: 4
10.5.4. GoogLeNet#
GoogLeNet is a deep convolutional neural network architecture developed by Google for efficient and accurate image classification tasks. It introduced the Inception module, that enables the network to perform multiple convolution and pooling operations in parallel. This allows the model to capture features at various scales while maintaining computational efficiency.
Download the GoogLeNet model from Onnx models Github repository and convert the dynamic shape into static to ensure compatibility with MMLC backend.
wget https://github.com/onnx/models/raw/main/Computer_Vision/googlenet_Opset16_torch_hub/googlenet_Opset16.onnx -O googlenet.onnx

cd ${ML_TOOLS_DIR}
git checkout ml-models

python ${ML_TOOLS_DIR}/utils/convert_shape_d2s.py \
--input_onnx googlenet.onnx \
--output_onnx model.onnx
An example image is provided below to demonstrate the GoogLeNet model’s capability in performing image classification.

Preprocess the image to match the model’s expected input format. The below script resizes the image to 224x224, normalizes pixel values, and saves it as input.bin.
pip install opencv-python
python -c "import numpy as np, cv2; img=cv2.imread('input.jpg'); img=cv2.resize(img,(224,224)); img=img[:,:,::-1]/255.0; mean=np.array([0.485,0.456,0.406]); std=np.array([0.229,0.224,0.225]); img=(img-mean)/std; img=np.transpose(img,(2,0,1)); input=np.expand_dims(img.astype(np.float32),axis=0); input.tofile('input.bin')"
Set compilation environment variables and compile the model using TVMC package.
export MRVL_SAVE_MODEL_BIN=1
export TVM_CONFIGS_JSON_DIR=${INSTALL_PREFIX_HOST}/share/tvm/configs
export MRVL_ENABLE_WB_PIN_OCM=1
python -m tvm.driver.tvmc compile \
    --target="mrvl, llvm -mtriple=${TARGET_TRIPLET} -mcpu=neoverse-n2" \
    --cross-compiler="${TARGET_TRIPLET}-gcc" \
    --target-mrvl-mattr='hw -arch=cn10ka -quantize=fp16 -wb_pin_ocm=0' \
    --target-mrvl-num_tiles=8 \
    --output model.tar \
    model.onnx
Use the dpdk-test-mldev application to run inference with the compiled model and preprocessed input.
mkdir -p /mnt/huge
mount -t hugetlbfs -o pagesize=2M nodev /mnt/huge
echo 4096 > /sys/kernel/mm/hugepages/hugepages-2048kB/nr_hugepages

# Bind ML device
dpdk-devbind.py -b vfio-pci 0000:00:10.0

# Run inferences with dpdk-test-mldev application
dpdk-test-mldev --lcores=4-23 -a 0000:00:10.0,fw_path=/lib/firmware/mlip-fw.bin -- \
    --test inference_ordered \
    --filelist <model_name>_0.bin,input.bin,output.bin \
    --tolerance 5 \
    --stats \
    --repetitions 1000
To interpret the output, first download the imagenet class labels and use the given script. The labels map the 1000 numeric indices in the output vector to human-readable class names (e.g., ‘goldfish’, ‘tabby cat’), allowing you to identify the predicted object.
wget https://raw.githubusercontent.com/pytorch/hub/master/imagenet_classes.txt -O imagenet_classes.txt

python -c "import numpy as np; labels=[l.strip() for l in open('imagenet_classes.txt')]; output=np.fromfile('output.bin', dtype=np.float32); print('Predicted:', labels[np.argmax(output)])"
For the example input image, we get the following output after interpretation.
Predicted: goldfish
10.5.5. MobileNetv2-12#
MobileNet models are image classification models that are trained on ImageNet dataset which contains images from 1000 classes. MobileNet models are very efficient in terms of speed and size and hence are ideal for embedded and mobile applications.
Download the Mobilenetv2-12 model from Onnx models Github repository and convert it to static shape to ensure compatibility with MMLC backend.
wget https://github.com/onnx/models/raw/main/validated/vision/classification/mobilenet/model/mobilenetv2-12.onnx

cd ${ML_TOOLS_DIR}
git checkout ml-models

python ${ML_TOOLS_DIR}/utils/convert_shape_d2s.py \
--input_onnx mobilenetv2-12.onnx \
--output_onnx model.onnx
An example image is provided below to demonstrate the MobileNet model’s capability in performing image classification.

Run the script to format the image for inference: resize, normalize, and save as input.bin.
pip install opencv-python
python -c "import numpy as np, cv2; img=cv2.imread('input.jpg'); img=cv2.resize(img,(224,224)); img=img[:,:,::-1]/255.0; mean=np.array([0.485,0.456,0.406]); std=np.array([0.229,0.224,0.225]); img=(img-mean)/std; img=np.transpose(img,(2,0,1)); input=np.expand_dims(img.astype(np.float32),axis=0); input.tofile('input.bin')"
Compile the model for execution on hardware.
export MRVL_SAVE_MODEL_BIN=1
export TVM_CONFIGS_JSON_DIR=${INSTALL_PREFIX_HOST}/share/tvm/configs
export MRVL_ENABLE_WB_PIN_OCM=1
python -m tvm.driver.tvmc compile \
    --target="mrvl, llvm -mtriple=${TARGET_TRIPLET} -mcpu=neoverse-n2" \
    --cross-compiler="${TARGET_TRIPLET}-gcc" \
    --target-mrvl-mattr='hw -arch=cn10ka -quantize=fp16 -wb_pin_ocm=0' \
    --target-mrvl-num_tiles=8 \
    --output model.tar \
    model.onnx
Run inference on hardware using dpdk-test-mldev with the compiled model and input.
mkdir -p /mnt/huge
mount -t hugetlbfs -o pagesize=2M nodev /mnt/huge
echo 4096 > /sys/kernel/mm/hugepages/hugepages-2048kB/nr_hugepages

# Bind ML device
dpdk-devbind.py -b vfio-pci 0000:00:10.0

# Run inferences with dpdk-test-mldev application
dpdk-test-mldev --lcores=4-23 -a 0000:00:10.0,fw_path=/lib/firmware/mlip-fw.bin -- \
    --test inference_ordered \
    --filelist <model_name>_0.bin,input.bin,output.bin \
    --tolerance 5 \
    --stats \
    --repetitions 1000
To interpret the output, first download the imagenet class labels and use the given script.
wget https://raw.githubusercontent.com/pytorch/hub/master/imagenet_classes.txt -O imagenet_classes.txt

python -c "import numpy as np; labels=[l.strip() for l in open('imagenet_classes.txt')]; output=np.fromfile('output.bin', dtype=np.float32); print('Predicted:', labels[np.argmax(output)])"
For the example input image, we get the following output after interpretation.
Predicted: starfish
10.5.6. VGG11#
VGG11 is an 11-layer deep convolutional neural network architecture from the VGGNet family. It is used for image classification tasks and are trained on the ImageNet dataset. VGG models provide very high accuracies but at the cost of increased model sizes. They are ideal for cases when high accuracy of classification is essential and there are limited constraints on model sizes.
Download the VGG11 model from the ONNX models GitHub repository and convert it to static shape for compatibility.
wget http://github.com/onnx/models/raw/main/Computer_Vision/vgg11_Opset16_timm/vgg11_Opset16.onnx -O vgg11.onnx

cd ${ML_TOOLS_DIR}
git checkout ml-models

python ${ML_TOOLS_DIR}/utils/convert_shape_d2s.py \
--input_onnx vgg11.onnx \
--output_onnx model.onnx
Any valid .jpg, .jpeg, or .png image with three color channels (RGB) can be used as input. The below image is used as an example to show the working of the model.

Resize the image to 224×224, normalize it, and save as input.bin using the script below.
pip install opencv-python
python -c "import numpy as np, cv2; img=cv2.imread('input.jpg'); img=cv2.resize(img,(224,224)); img=img[:,:,::-1]/255.0; mean=np.array([0.485,0.456,0.406]); std=np.array([0.229,0.224,0.225]); img=(img-mean)/std; img=np.transpose(img,(2,0,1)); input=np.expand_dims(img.astype(np.float32),axis=0); input.tofile('input.bin')"
Configure the environment and compile the model with TVMC.
export MRVL_SAVE_MODEL_BIN=1
export TVM_CONFIGS_JSON_DIR=${INSTALL_PREFIX_HOST}/share/tvm/configs
export MRVL_ENABLE_WB_PIN_OCM=1
python -m tvm.driver.tvmc compile \
    --target="mrvl, llvm -mtriple=${TARGET_TRIPLET} -mcpu=neoverse-n2" \
    --cross-compiler="${TARGET_TRIPLET}-gcc" \
    --target-mrvl-mattr='hw -arch=cn10ka -quantize=fp16 -wb_pin_ocm=0' \
    --target-mrvl-num_tiles=8 \
    --output model.tar \
    model.onnx
Run inference on hardware using dpdk-test-mldev with the compiled model and input.
mkdir -p /mnt/huge
mount -t hugetlbfs -o pagesize=2M nodev /mnt/huge
echo 4096 > /sys/kernel/mm/hugepages/hugepages-2048kB/nr_hugepages

# Bind ML device
dpdk-devbind.py -b vfio-pci 0000:00:10.0

# Run inferences with dpdk-test-mldev application
dpdk-test-mldev --lcores=4-23 -a 0000:00:10.0,fw_path=/lib/firmware/mlip-fw.bin -- \
    --test inference_ordered \
    --filelist <model_name>_0.bin,input.bin,output.bin \
    --tolerance 5 \
    --stats \
    --repetitions 1000
Download the ImageNet label file and run the script to map numeric predictions to class names.
wget https://raw.githubusercontent.com/pytorch/hub/master/imagenet_classes.txt -O imagenet_classes.txt

python -c "import numpy as np; labels=[l.strip() for l in open('imagenet_classes.txt')]; output=np.fromfile('output.bin', dtype=np.float32); print('Predicted:', labels[np.argmax(output)])"
For the example input image, we get the following output after interpretation.
Predicted: lesser panda
10.5.7. Resnet101_v1b#
ResNet101 is a deep convolutional neural network architecture with 101 layers, known for its success in image classification tasks. It is designed for image classification, object detection, and feature extraction, extending the ideas of residual learning to enable training of networks with over 100 layers.
Resnet101 model is available in the Onnx models Github repository. Use convert_shape_d2s.py to convert the dynamic shape into static.
wget https://github.com/onnx/models/raw/main/Computer_Vision/gluon_resnet101_v1b_Opset16_timm/gluon_resnet101_v1b_Opset16.onnx -O resnet101.onnx

cd ${ML_TOOLS_DIR}
git checkout ml-models

python ${ML_TOOLS_DIR}/utils/convert_shape_d2s.py \
--input_onnx resnet101.onnx \
--output_onnx model.onnx
The image given below is used an example to demonstrate the image classification task performed by the model.
Preprocess the image to match the model’s expected input format. The script below resizes the image to 224x224, normalizes pixel values, and saves it as input.bin.
pip install opencv-python
python -c "import numpy as np, cv2; img=cv2.imread('input.jpg'); img=cv2.resize(img,(224,224)); img=img[:,:,::-1]/255.0; mean=np.array([0.485,0.456,0.406]); std=np.array([0.229,0.224,0.225]); img=(img-mean)/std; img=np.transpose(img,(2,0,1)); input=np.expand_dims(img.astype(np.float32),axis=0); input.tofile('input.bin')"
Set compilation environment variables and compile the model.
export MRVL_SAVE_MODEL_BIN=1
export TVM_CONFIGS_JSON_DIR=${INSTALL_PREFIX_HOST}/share/tvm/configs
export MRVL_ENABLE_WB_PIN_OCM=1
python -m tvm.driver.tvmc compile \
    --target="mrvl, llvm -mtriple=${TARGET_TRIPLET} -mcpu=neoverse-n2" \
    --cross-compiler="${TARGET_TRIPLET}-gcc" \
    --target-mrvl-mattr='hw -arch=cn10ka -quantize=fp16 -wb_pin_ocm=0' \
    --target-mrvl-num_tiles=8 \
    --output model.tar \
    model.onnx
Use the dpdk-test-mldev application to run inference with the compiled model and preprocessed input.
mkdir -p /mnt/huge
mount -t hugetlbfs -o pagesize=2M nodev /mnt/huge
echo 4096 > /sys/kernel/mm/hugepages/hugepages-2048kB/nr_hugepages

# Bind ML device
dpdk-devbind.py -b vfio-pci 0000:00:10.0

# Run inferences with dpdk-test-mldev application
dpdk-test-mldev --lcores=4-23 -a 0000:00:10.0,fw_path=/lib/firmware/mlip-fw.bin -- \
    --test inference_ordered \
    --filelist <model_name>_0.bin,input.bin,output.bin \
    --tolerance 5 \
    --stats \
    --repetitions 1000
Download the imagenet class labels and use the given script to map the numeric indices in the output vector to human-readable class names to identify the predicted object.
wget https://raw.githubusercontent.com/pytorch/hub/master/imagenet_classes.txt -O imagenet_classes.txt

python -c " import numpy as np; labels=[l.strip() for l in open('imagenet_classes.txt')]; output=np.fromfile('output.bin', dtype=np.float32); print('Predicted:', labels[np.argmax(output)])"
For the example input image, we get the following output after interpretation.
Predicted: goldfish
10.5.8. Darknet-53#
DarkNet-53 is a convolutional neural network that is 53 layers deep. It comprises of 53 convolutional layers, making it deeper and more powerful. This increase in depth allows the network to capture more complex features, improving its detection capabilities.
Download the Darknet-53 model from Onnx models Github repository and convert the dynamic shape into static to ensure compatibility with MMLC backend.
wget https://github.com/onnx/models/raw/main/Computer_Vision/darknet53_Opset16_timm/darknet53_Opset16.onnx -O darknet53.onnx

cd ${ML_TOOLS_DIR}
git checkout ml-models

python ${ML_TOOLS_DIR}/utils/convert_shape_d2s.py \
--input_onnx darknet53.onnx \
--output_onnx model.onnx
Any .jpg, .jpeg, or .png image can be used as input for the image classification task.
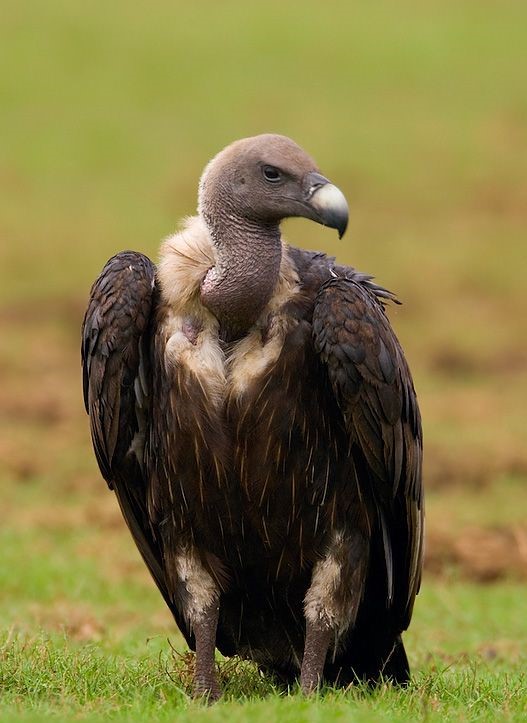
Preprocess the input image to match the Darknet-53 model’s required input size (the ONNX variant here expects 256×256) and save it as input.bin.
pip install pillow
python -c " from PIL import Image; import numpy as np; img = np.array(Image.open('input.jpg').convert('RGB').resize((256,256)), dtype=np.float32)/255.0; np.expand_dims(np.transpose(img,(2,0,1)),0).tofile('input.bin')"
Compile the model for execution on hardware.
export MRVL_SAVE_MODEL_BIN=1
export TVM_CONFIGS_JSON_DIR=${INSTALL_PREFIX_HOST}/share/tvm/configs
export MRVL_ENABLE_WB_PIN_OCM=1
python -m tvm.driver.tvmc compile \
    --target="mrvl, llvm -mtriple=${TARGET_TRIPLET} -mcpu=neoverse-n2" \
    --cross-compiler="${TARGET_TRIPLET}-gcc" \
    --target-mrvl-mattr='hw -arch=cn10ka -quantize=fp16 -wb_pin_ocm=0' \
    --target-mrvl-num_tiles=8 \
    --output model.tar \
    model.onnx
Use the dpdk-test-mldev application to run inference with the compiled model and preprocessed input.
mkdir -p /mnt/huge
mount -t hugetlbfs -o pagesize=2M nodev /mnt/huge
echo 4096 > /sys/kernel/mm/hugepages/hugepages-2048kB/nr_hugepages

# Bind ML device
dpdk-devbind.py -b vfio-pci 0000:00:10.0

# Run inferences with dpdk-test-mldev application
dpdk-test-mldev --lcores=4-23 -a 0000:00:10.0,fw_path=/lib/firmware/mlip-fw.bin -- \
    --test inference_ordered \
    --filelist <model_name>_0.bin,input.bin,output.bin \
    --tolerance 5 \
    --stats \
    --repetitions 1000
The generated output.bin file contains the model’s logits for all ImageNet classes. To find the prediction, just take the index of the highest logit (argmax) and match that index with the corresponding label in imagenet_classes.txt.
python -c "import numpy as np; labels=[l.strip() for l in open('imagenet_classes.txt')]; output=np.fromfile('output.bin',dtype=np.float32); print('Predicted class:', labels[np.argmax(output)])"
For the example input image, we get obtain the following predicted class.
Predicted class: vulture
10.5.9. Encrypted Traffic Classification Model#
The Traffic Classification model is designed to identify different types of encrypted network traffic, including VPN, non-VPN, etc., by analyzing flow-level features rather than packet payloads. Since traditional port-based and payload-based methods are ineffective for encrypted traffic, the model instead uses static characteristics such as packet size sequences (PSS), byte distribution, TLS handshake details, and DNS information extracted from PCAP files. The dataset is processed using the Joy 2.0 tool. The PCAP files are first converted to JSON and then into tabular features. Refer to the repository README for full implementation and usage details. The model repository and dataset used for training are given in the References section.
Clone the Encrypted_Traffic_Classification repository and apply the traffic.patch file available in the repository.
This patch switches TRAIN.sh to use train_updated.py because the original train.py depends on outdated TensorFlow/Keras and preprocessing logic that no longer works with modern versions, updates Table_Generator.py, and strengthens preprocessing in toTrain.py by adding improved filtering and cleaning rules.
git clone https://github.com/MarvellEmbeddedProcessors/Encrypted_Traffic_Classification.git
cd Encrypted_Traffic_Classification
git checkout release
git apply patches/traffic.patch
Create a Python environment and install the prerequisites using the requirements.txt file inside the repository.
python3 -m venv myvenv
source myvenv/bin/activate

pip install -r requirements.txt
Clone the Joy tool in home directory and apply the joy.patch file available in the repository. This patch updates the Joy script to explicitly run under Python 2.7 and adjusts the library path accordingly because the Joy sleuth tool is Python-2-based and incompatible with Python 3. Continue with configuration and building Joy. Joy is used to convert PCAP files into JSON format.
git clone https://github.com/cisco/joy.git
cd ~/joy
git apply ~/Encrypted_Traffic_Classification/patches/joy.patch

./config.sh
sudo apt-get install build-essential libssl-dev libpcap-dev libcurl4-openssl-dev
./configure --enable-gzip
make clean
make
Follow the instructions provided in the repository README to preprocess the dataset, train the model, and generate the final Keras model.
After training completes, the final model is saved in .keras format within the TEST1212 folder. This output path is defined in the TRAIN.sh configuration.
TEST1212/final_model.keras
To deploy the trained model on MLIP, first convert the .keras model to ONNX using tf2onnx, then convert the ONNX model to static shape using convert_shape_d2s.py script.
pip install tensorflow>=2.16.1 tf2onnx==1.16.1
python3 -c "import tensorflow as tf, tf2onnx, onnx;
m = tf.keras.models.load_model('TEST1212/final_model.keras');
s = [tf.TensorSpec((None, *m.input_shape[1:]), tf.float32, name='input')];
p, _ = tf2onnx.convert.from_keras(m, input_signature=s, opset=13);
onnx.save(p, 'final_model.onnx')"

python ${ML_TOOLS_DIR}/utils/convert_shape_d2s.py \
--input_onnx final_model.onnx \
--output_onnx model.onnx
Set the required environment variables and compile the model.
export MRVL_SAVE_MODEL_BIN=1
export TVM_CONFIGS_JSON_DIR=${INSTALL_PREFIX_HOST}/share/tvm/configs
export MRVL_ENABLE_WB_PIN_OCM=1
python -m tvm.driver.tvmc compile \
--target="mrvl, llvm -mtriple=${TARGET_TRIPLET} -mcpu=neoverse-n2" \
--cross-compiler="${TARGET_TRIPLET}-gcc" \
--target-mrvl-mattr='hw -arch=cn10ka -quantize=fp16 -wb_pin_ocm=0' \
--target-mrvl-num_tiles=8 \
--output model.tar \
model.onnx
Use the scripts provided in the model repository to generate inference-ready input. Use the pcap_to_json.py script to convert PCAP to JSON files, and then use multi_gen.py to convert it to a CSV file. For testing, you can use any JSON file from the JSON folder in the data directory in the repository. The following commands demonstrate how to generate a CSV file for the test input add_vpn_email2a_14.json.
cd prepro && sh multi_gen.sh ../data/JSON/add_vpn_email2a_14.json input.csv 0
Now we need to preprocess the test input using the same feature-engineering pipeline that was applied during training. The model expects fixed input features, so the preprocessing must reproduce the exact training transformations. The inference dataset is assumed to be of the same format as the VPN-nonVPN dataset (ISCXVPN2016), which was used for training. Each dataset entry contains multiple flows from the same network capture.
The generate_inference_files.py script applies the same filtering, feature extraction, normalization, and column-alignment steps used during training. It then converts each flow into a separate .bin file, resulting in multiple inference-ready files stored in the inference_bins directory. Any one of the created files from this directory can be used as input for running inference.
python generate_inference_files.py input.csv
For the example input add_vpn_email2a_14.json, the preprocessing pipeline extracts 292 valid traffic flows. Consequently, 292 corresponding .bin files are generated in the inference_bins directory. Any one of these files can be used as input for running inference.
Set up hugepages, bind the ML device, and run inference:
mkdir -p /mnt/huge
mount -t hugetlbfs -o pagesize=2M nodev /mnt/huge
echo 4096 > /sys/kernel/mm/hugepages/hugepages-2048kB/nr_hugepages

# Bind ML device
dpdk-devbind.py -b vfio-pci 0000:00:10.0

# Run inferences with dpdk-test-mldev application
dpdk-test-mldev --lcores=4-23 -a 0000:00:10.0,fw_path=/lib/firmware/mlip-fw.bin -- \
--test inference_ordered \
--filelist <model_name>_0.bin,input.bin,output.bin \
--tolerance 5 \
--stats \
--repetitions 1000
After inference, inspect the output and predicted class:
python3 -c "import numpy as np;
LABEL2DIG={'chat':0,'voip':1,'trap2p':2,'stream':3,'file_trans':4,'email':5,'vpn_chat':6,'vpn_voip':7,'vpn_trap2p':8,'vpn_stream':9,'vpn_file_trans':10,'vpn_email':11};
DIG2LABEL={v:k for k,v in LABEL2DIG.items()};
a=np.fromfile('output.bin',dtype=np.float32);
i=a.argmax();
print('\npredicted_label =', DIG2LABEL[i], '| \npredicted_index =', i, '| \nvalues =', a)"
For the example input add_vpn_email2a_14.json, we get the following output after interpretation.
predicted_label = vpn_email |
predicted_index = 11 |
values = [0.0000000e+00 0.0000000e+00 0.0000000e+00 2.6154518e-04 0.0000000e+00
3.4761429e-04 7.4434280e-04 5.4264069e-04 0.0000000e+00 9.3996525e-05
0.0000000e+00 9.9804688e-01]
This confirms that the model correctly predicted the input as vpn_email with a high confidence score of 0.998.
10.5.10. References#
[1] LUCID repository on GitHub
[2] R. Doriguzzi-Corin, S. Millar, S. Scott-Hayward, J. Martínez-del-Rincón, and D. Siracusa, “Lucid: A Practical, Lightweight Deep Learning Solution for DDoS Attack Detection,” IEEE Transactions on Network and Service Management, vol. 17, no. 2, pp. 876-889, June 2020. doi: 10.1109/TNSM.2020.2971776. Available: IEEE Xplore
[4] Encrypted_Traffic_Classification repository on GitHub